All posts by admin

guaca

Guacamole

By | Recipes | No Comments

This is a super simple recipe, really. Basically it’s jusy chopping up or smashing up avocado with some tomatoes. BUT i am sharing with you one of my fancy ones today, to impress your family and friends!

INGREDIENTS:

1 large avocado, peeled, seeded and cut into small cubes (about 1/4 inch)
3 large tomatoes (roma tomatoes if you have), finely diced
1/4 cup zucchini, peeled, and finely diced
1/4 cup cucumber, peeled, seeded and finely diced
1/4 cup pineapple, finely diced (this is OPTIONAL but recommended)
1/4 chopped cilantro
1 Tablespoon chopped scallion
1 Tablespoon red onion, minced
1 teaspoon lime juice
pinch of Natural sea salt
blackpepper as needed

DIRECTIONS:
Combine all these ingredients in a large bowl and mix them slowly by hand
Store in an airtight container in the refrigerator for up to 12 hours. Always better eaten fresh.

bababa.squarespace.com_

Bananarama Pancakes

By | Recipes | No Comments

So, I woke up today, feeling super duper drained. Rangga, my #1stbaby ( who will be 12 yro soon, but always my baby, haha..) had this nasty fever a day ago, which persisted and even went up as high as 40.1 Celcius and nothing I tried (seemed) to work.

Even though, I have been practicing natural healing  towards myself and through the consults I give and share with others, and stand by those beliefs religiously to trust the body, it’s always hard when it happens to your own child.  It’s that vulnerable moment when  you are “just a mother” who is exhausted and frustrated and just wants her babyboo boo to feel better real quick, and you wonder why, why, why all those theories you have read and learnt are just not working!!

Well. long story short, after a whole day and night of cold water compress bag, feeding him soups, juices, herbal teas, lemon water and making sure his water intake was adequate plus also keeping an extrea eye on his urine quota– ( in my earlier days as a trained lactation conselor, I had the honor of having a senior and very experienced pediatrician as my mentor. She was a certified lactation conselor too, besides a skilled pedriatician. I worked closely with her, and from her I learnt that there was a formula you needed to keep on track with when it comes to pee and dehydration, to rule out Dengue Fever, which is so common in Asia. I will gladly share with you more on this, if you wish to know more, you know, as in how many cc/kilogram weight/hour etc)– this morning I woke up to the sound of ” Mama, I’m really hungry, may I have some pancakes?”

That sound was the most beautiful thing I have heard all night. And so, i gave him a quick kiss, checked his temperature, and went to the kitchen to make him breakfast. Thank GOD, fever gone. His cough was also so much better.

I know you are probably scrolling down by now to look for the recipe. Hahaha.. so here it is, for you!
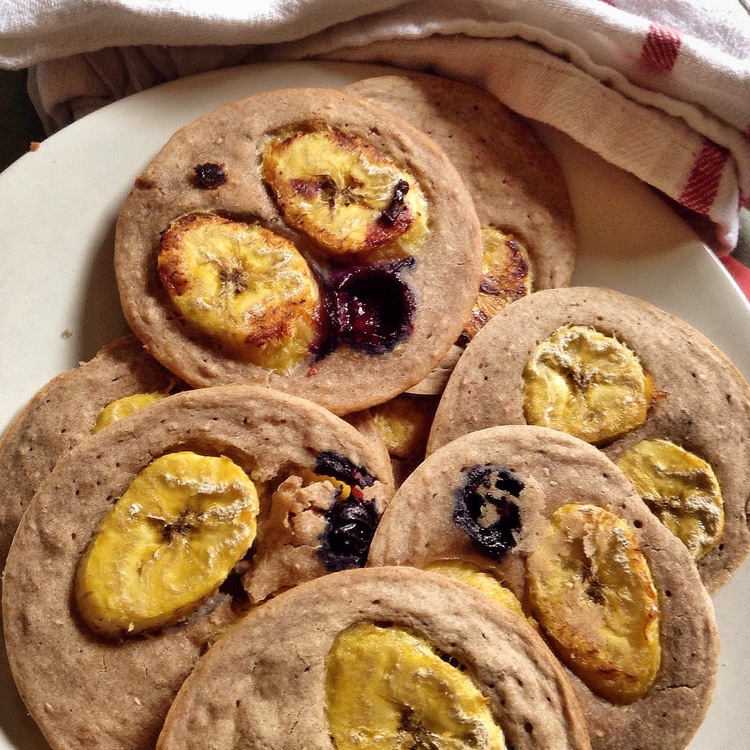
BANANARAMA PANCAKES 

1/4 cup Cassava Flour
1/2 cup Buckwheat Flour
1/4 t baking soda
1/2 t cinnamon powder
pinch of salt
pinch of stevia (or 1 t coconut sugar)

1 chia egg ( 1 T chiaseeds + 1/4 cup water)
1 1/4 cup almond milk (or plantbased milk of your choice, preferably UNSWEETENED)
1 t lemon juice (fresh)
1-2 drops Medicinal Flower Caramel Essence (optional but reccomended. You can use plain caramel essence if that is what you have, no worries)
1 Banana ( i used Pisang Kepok, a kind of banana here in Indonesia, that cannot be eaten raw as it is always hard, but once  cooked, results in a soft, rich and sweet banana. This kind of bananas are usually baked, steamed or used to make Banana Fritters)
1 T coconut oil to coat the pancake tins.

METHOD:

  • Mix dry ingredients in a bowl, then form a well and mix in all wet ingredients, chia egg last. Stir until all perfectly combined.
  • Preheat the ove to 200 celcius, after doing so, start slicing your bananas thinly, then put some coconut oil on your baking tins..
  • Spoon in batter mixture into pancake tins and place the bananas on top as you like.
  • Bake in oven for 15 minutes, then check, to flip for another 5 minutes.
  • Enjoy this with warm ginger tea. Yum!!

Note: cooking it on a normal pancake pan on the stove is also possible. You just need to watch the heat :) I like baking them, because the baking tins give me a perfect circle. Hahaha… I have OCD (Obssesive Compulsive Disorder). I know 😀

I really hope you try this at home. Really, this is the easiest Gluten Free Pancake with low sugar that you can feed your family!

These babies taste soo good on their own, but if you wanted to make a healthier option Chocolate Sauce for you to drizzle on the pancakes, like in my video, below, here’s a quick and simple recipe:

CHOCOLATE SAUCE

1/2 cup coconut oil

1/2 cup raw cacao powder

1/4 cup maple syrup ( i used 3 T maple syrup and a pinch of stevia to control the sweetness, remember, bananas are already sweet)

pinch of Seasalt or Himalayan salt

Over low heat (or medium heat, if you are in a cold country), heat the coconut oil, then slowly whisk in cacao powder, sweetener and salt. Mildly heat, NOT cook or burn :DD


Drizzle over pancakes and take pictures and enjoy!!

They seem to disappear QUICKLY!! YOU. HAVE.BEEN.WARNED !!

PLease leave comments, if you can make the time, and be nice and proper, since other people will be reading too. Not that I need to remind you, but, you know, just so everybody can have fun reading this post and actually feeling the positive energy from it and really going into the kitchen to try.

Don’t forget to tag my instagram when you do!! I am at @sophienavita and if anyone wants to explain more about Pisang Kepok (kepok banana) in the comments, please doooooo:)) I guess it’s like a plaintain, but really sweet and decadent once you cook it. Cannot be eaten raw.

And here’s the YOUTUBE LINK to the PANCAKE VIDEO … tell me if you like it :)


https://www.youtube.com/watch?v=kCcgFTAhtJA&feature=youtu.be

CLICK… NOWW :))

If anyone in Indonesia wants to know where I get my GF flour from, please just ask away in comments, and I will be more than happy to share:))

Oh.. and Happy Birthday KD! The beautiful Krisdayanti. A very famous singer in Indonesia. I love this woman and all her guts! Known her since forever, and I have a good memory when it comes to dates and birthdays! #superRandom Her instagram is @krisdayantirl if you want to know :)) hahaha..

Love and Light to you!

Always in health,

Sophie xoxo

veggiestock

Veggie Stock

By | Recipes | No Comments

This post is going to be super easy peezy lemon squeezy. It’s about making VEGGIE STOCK. Or some people like to call it VEGGIE BROTH (although technically, there is a slight difference, but whatevsss haha) So here’s how I make my version of VEGGIE STOCK, as usual I always put the Indonesian translation to it in brackets. You can make your own version. Just remember, don’t be stingy on the veggies. They will bring out all the aroma and goodness and chockfull of NUTRIENTS!! NEVER again will you go back to packaged food industry broth or stock.

INGREDIENTS:

4 chopped carrots
2 cups brown onion (bawang bombay), chopped
1 handful of Chinese Leek ( kucai)
1 handful of spring onion ( daun bawang)
1 handful of parsley ( daun peterseli)
1 handful of cilantro (daun wansui/daun ketumbar)
1 cup of celery chopped (or if using asian celery which are thinner, just 1 handful)
1 red bell pepper chopped ( paprika merah)
2-5 garlic cloves chopped
2 t coarse black pepper (merica bubuk hitam kasar)
2 bay leaves (daun salam)
1/2 cup chopped tomato
1/4 cup sundried tomatoes chopped (optional but reccomended)
2 liters water ( around 1 quart of water)

Put them all in a pot, add water, let it boil, then once boiled, turn down heat and let sit on stove for 30-45 minutes, without covering the pan. Add more water slowly if you feel the need to. Once cooked, turn off heat and let cool, then strain and keep.

In the refrigerator, it should keep for 3-5 days. For longer life, i put mine in ice cube trays and freeze them, they can go for 3 months even!

Taruh semua di panci berisi air dan masak hingga mendidih, lalu kecilkan api dan biarkan selama 30-45 menit, panci tidak ditutup. Kalau airnya kurang, silakan tambah sendiri sedikit2. Biarkan sejuk, lalu saring dan simpan di kulkas biasa dapat bertahan 3-5 hari. Di freezer (bekukan ke dalam wadah es batu) dapat bertahan sampai 3 bulan. STOP memakai kaldu buatan pabrik ya. Coba ini aja. Kita tahu apa yang kita masukkan di dalamnya :)) Keluarga adalah harta bukan? Berikanlah kepada mereka yang terbaik.

v2

Raw Almond Mylk – indonesia makan sayur

By | Recipes | No Comments

1 cup almonds, washed, rinsed then soaked overnight, rinse and drain(you can peel OR not peel, your choice)
3 cups purified water
4-5 medjool dates (OPTIONAL, you can always do a PLAIN version and sweeten with your choice of coconut sugar, honey, or even stevia)
1/4 teaspoon vanilla extract or scrape off vanilla from 1 vanilla pod.

DIRECTIONS:

1. Put all the ingredients in a high powered blender and blend until smooth
2. Pour milk into a cloth mesh bag and “milk” it
3. Enjoy the milk immediately or store in sealed glass jar for 4-5 days
4. Store the leftover pulp in an airtight container in a FREEZER for up to 2 months. You can use them to bake cookies or breads. Really recommended.

rsito

Turmeric Nutmeg Risotto

By | Recipes | No Comments

So.. Here’s the Risotto story! Hello again, by the way. Hope you’re in joy and wellness!

For those of you who know me, you might probably be asking why, lately, I am posting more of my cooked foods on my instagram account (@sophienavita) rather than my rawfood creations? As a rawfoodchef, why am i doing this? The answer in short: why not?

The long answer is ( seriously, do you have time for this? Haha) : I am a person who just loves listening to her body. You know the term ” my gut tells me..” Yeahh.. I go by my gut.. I just feel I am preparing myself for something new in front ( perhaps a new business? Can’t quite explain it in words just yet, but I know it) aaaannnnddd I feel that as a mother of two little handsome ogres ( they are really that handsome, but with the appetite of ogres) I need to up my game in the cooking world to create more diversity in my plantbased menus. So right now, all my cooking, I’m doing guided by my school ROUXBE cooking school where I taking certification as a plantbased chef. Go look them up. They’re SOLID! And I love their structure. And I love Chef Chad Sarno. ( did i just say that out loud? Well.. He is a great plantbased chef! Go look him up too!)
So, why post Risotto? Because I did not give much thought to this dish at first. Why would I? It’s just rice . Rice is a very common staple in the Indonesian culture. Indonesians eat chicken over rice. Fish over rice. Stews over rice. We even eat… Rice OVER RICE  It is THAT common! Why would I need to learn how to cook rice?
Alas, in every learning experience, i learned that to obtain the best results, one must drop all their self limitting beliefs, including my confidence that nobody can cook rice better than me ( being an Indonesian.. Hellooo??) and also I was consistantly challenged to expose my vegetables to heat (as a rawfood chef, THIS. IS. NOT. EASY)

So anyways.. Long story short, you will need:
– 1 cup Italian or Arborio rice
– 5 cups veggie stock (*)
– 1 cup diced carrots
– 1/2 cup peas
– 1/2 cup green beans ( i used red today)
– 1/2 cup red bell pepper
– 1 teaspoon grated tumeric
– 1 teaspoon coriander powder
– 1/2 teaspoon + a pinch nutmeg
powder ( or grated fresh nutmeg)
– pinch of clover powder or 3 whole cloves.
– 2 teaspoons paprika powder ( optional but definitely adds flavor)
– 1 teaspoon himalayan salt/ seasalt
– 1 teaspoon ground pepper
– 2 teaspoons minced garlic
– 1 tablespoon minced brown onion
– 1 bay leaf
– 2 kaffir lime leaves
And lotsa LOVE!

Mise en place

Mise en place

Like I always say, a good cook, gets his/ her mise en place ready!

Okay! Did you get your mise en place ready and in order? Let’s go then!

1. First, simmer the veggie stock and parcook the carrots, peas and green beans, taking turns to put them in the hot simmering pot for ONE minute them taking them out, and IMMEDIATELY put in an ice bath( a bowl filled with ice water or very cold water) this will stop the cooking process. Put aside. You might want to use a strainer for this so you don’t panic when you need to get your veggoes out.Look at the picture so you know what I mean.

The carrots are being parcooked in the simmering veggie stock with a strainer.2. On low heat, add a bit of water ( or coconut oil if you like, around 1/2 tbspn) and put in the onions and stir. Sweat the onions with the garlic, turmeric, nutmeg, coriander, bay leaf and kaffir lime leaves . I already wrot about how to sweat vegetables, please look at my En Papillote de tofu champignon recipe.3. Once sweating is done, add in 1/4 cup veggie stock and keep stirring, then put in rice and stir until all herbs and aromatics are even into the rice. When veggie stock has evaporated, pour in some more, per 1 cup,and stir until liquid evaporates again, add another cup veggie stock. At this step, you can crank up the heat a bit to medium, let it simmer, keep stirring. Add salt.

4. Test taste to see if the rice is done, it should taste just right. Not hardy and not mushy. This is why we cannot use our Indonesian rice, because it will turn into porridge. Whereas italian rice or arborio rice will still retain it’s rice shape. ( i bought mine at Ranch Supermarket. I bet they have some also at Kem chicks)

Rice should look like this

Rice should look like this

5. Once rice is done, fold back in all your carrots, peas, green beans after straining them from the ice bath.
Add in ground pepper.Stir and mixTurn of heat. Only now you can cover the pot with a lid for 5 minutes only( remember, heat off) and them open and fluff rice with a big spoon.

6. Before serving, add in the diced red bell peppers for color;))

And tadaaaaa… Risotto!!

(*) note:
Veggie stock is easy to make. Just use your veggie scraps or maybe new ones if you like and throw them in 2 liters of water. Here are some ideas for veggies I put in my stock: 1 brown onion, 1 almost old yellow bell pepper, 1 small red pepper, 1 cup chopped spring onions( daun bawang), 3 carrots( chopped into big pieces). I had some fennel, so I put that in, it was so good! A friend’s farm harvested them locally and gave me some:) so happy!
You can also put celery, parsley, tomatoes, cilantro( daun ketumbar) etc.. Oh the options are endless.
Simmer these veggies for 2-3 hours on low heat, of course before that, bring to boil first then lower heat to simmer.
You can use stock straight away, or cool down and then put into ice cube molds, keep in freezer for 3months:))

Okay, that’s it from me. Do tag me on my instagram @sophienavita if you ever make this Risotto! And don’t forget to check out my youtube videos at  http://m.youtube.com/watch?v=RHf4rwdtNWw

See you in my next post! Toodle looo! Buonaappetito!

spices

En Papillote de tofu champignon (pepes jamur)

By | Recipes | No Comments

Hello! Welcome back to my blog. My random blog. It can be anything from a #randomthingsinmyhead story to a recipe post like what I’m gonna do now!
Yes, i was trained as a rawfood vegan chef, but that doesn’t mean i can’t cook! Ha! Lately, I’m actually practicing my cooking skills again, to not get rusty. Yes, i do still eat rawfoods.

Enough questions.. Let’s start!

So PEPES is basically something we cook in banana leaf, in a steamer. It varies from fish, chicken, lamb, even sweet rice flour cake, although the cakes, we don’t called pepes. They have their own respective names. And today, I am sharing with you my tofuShroom pepes. Yes, totally safe for all you GF and vegan fans in case you were about to pop the question!

A good cook knows that preparation is KEY! So mise en place is a MUST.

So you can see this is my mise en place so you don’t create panic on the dancefloor… You will need:

  • 2 cups mashed tofu(just mash with your hands)
  • 1,5 cups small diced mushrooms( i used shitake, you can use what you like)
  • 1/2 cup of chopped spring onions( daun bawang in Indonesian)
  • 1/2 cup of chopped leek ( i used the indonesian “kucai”)
  • 1/2 cup thai basil or “kemangi”
  • 1/4 cup of chopped parsley and cilantro
  • 1/4 cup small diced tomatoes
  • 1/2 cup chopped red bell pepper
  • 2 tbsp chopped garlic
  • 2 tbsp ground black pepper
  • 1 tbsp paprika powder
  • 1 tbsp coriander powder
  • 1 tbsp grated fresh turmeric
  • 5 tbsp Tamari or you can use Braggs amino acid ( Tamari is just a GF and low sodium version of it– ini pengganti kecap asinku krn rendah sodium ya)
  • Himalayan salt or sea salt to taste
  • 1 tbspn virgin coconut oil
  • 1/2 tbspn toasted sesame oil
  • 1/4-1/2 cup water

First, let us sweat the garlic,mushrooms,leek,spring onions, tomatoes. Sweating is a method in cooking that helps you build your base flavour of the whole dish. How?

1.Pour the coconut oil into pan on low heat, put in garlic and just stir every now and then until they are softened.

After they are softened, add in 1/4 cup of water then put in the rest of the accompaniments i listed above to sweat. It will look something like this

Keep stiring in low heat. This is the base of our flavor so pay attention to it, because it will be the foundation of the whole Pepes. In chef lingo the fancy name for this is mirepoix … Ahh je parle français! Hahaha!

Towards the end, when all ingredients are soft, I added in the tamarigroundpepperpaprika powder coriander powder, and stirred for a bit, then i turned heat off, and poured it into my bowl of mashed tofu.

2. Stir the mirepoix well into the mashed tofu, adding the grated turmeric, and bell peppers, thai basil,parsley and cilantro and toasted sesame oil. Make sure it is evenly mixed and test taste. If it is not salty enough for you, here is where you add in a bit of salt.

While I was doing this, I remembered i had some bittergourd left and I absolutely love it. So I halved the tofu batch and made 1 batch with bittergourd and chopped chilli, 1 without for my kids. This is TOTALLY YOUR CHOICE

3. NOW, the fun part! Wrapping it.. After you have wiped clean( i washed mine .. Germ freak haha ) your banana leaves, cut them into rectangles around the size of 18x14cm or around 8×5 inches ( i hope i got my metrics right hahah..) OR you can just cut to what you need. It should be able to contain a 1/4 cup batch of tofushroom, so improvise  ( i’m such a newbie at this blog recipe writing thingy, sowwwyyy)

4. Double layer the banana leaf just in case it tears and put 1/4 cup tofushroom mix on it and now we wrap and secure with toothpicks! Like so:

At this point your mix will kinda look like a doggie bowl ,but worry not, it’s gonna be so delicious at the end, i promise

DISCLAIMER: these are not my hands .. Let me introduce you to this amazing calm woman who helps me around the house, she’s in her 50s and so pleasant. Even the way she ended up working with us, was beautiful. She just showed up at my door. I kid you NOT. Hahah. That’s another blogpost, i will tell you one day, but here she is, 1,5 yrs later, you can call her “bibik”…. Lovely woman. I love her.

5. While your are doing your wrapping, heat the water for steaming. When all is ready, place wraps in the steaming basket first, and then put the basket on top of the pot of boiling water, this is the safest way so you do not burn yourself from the steam coming from the pot below.

6. Steam around 15-20 minutes ( depends on the air flow space you have in you basket, do not over fill) . You know they are done when the banana leaves wilt a bit like this:

And now.. VOILA!

You can enjoy as is, or eat as a filling on a romaine leaf with some steamed carrots like i did! Or have some rice, like my family did.

Now, go make it, and tag me on my instagram @sophienavita !
Also.. If you haven’t seen it yet, here’s a link to my YOUTUBE  http://m.youtube.com/watch?v=gJO1GR9qebA where i made a simple green pinacolada smoothie ! I know, it’s been a long time since i put in a new video, but it will come, i promise!
Bon Appetit and don’t forget to cook with love! Tag me! Bye for now!