All posts by admin

image3

Spelt Waffles

By | Recipes | No Comments

Hello..

Have you ever worked with any ingredients that are new to you?

I know this might sound crazy to some, but apparently, this is my FIRST time working with spelt flour!! 😃😃

I never thought I could be eating spelt because even though it’s wheat free, it still contains a low amount of gluten.

I have been doing some experiments on my body lately. So if you have been following me for a bit, you must know by now that I have some sort of intolerance to gluten. I’m pretty sure everybody does, but maybe in different ways. Some milder than what others would experience.

I am not highly intolerant to gluten to the point where I could be hospitalized by it. I really feel for those of you who totally cannot have gluten.Â đŸ˜©

So what happens when I eat gluten? My tummy gets so bloated as if I am 4 months pregnant, and the whole day would just be a mess for me. I would be so irritable and my mind cannot think clear. And I wish it were just a case of gas in my tummy that I can expel through random series of burps and farts.. Oopssy.. Gross I know, but how else do I explain? Okay, passing wind. 😃😃

Lately though, I have been daring myself to try to reintroduce wheat again in my diet ( please do not follow what I do, as my only grounds of reintroducing wheat in my diet was because I needed to–after a series of allergy elimination techniques I am working on with my Naturopath.)

The result? I find that if I have organic wheat products, and just enough, not too much, I am totally okay with it. So Yayyy for that. It’s progress, don’t you think?

Although, I must say, I am not a fan of wheat, so just a little bit occasionally and must be organic, is safe for me 😊

Back to topic, ever since this episode, I have also dared myself to try SPELT. Spelt is high in fibre and low in fat. It is an ancient grain, also known as triticum spelta. You must not confuse this with bread wheat which is mostly from triticum sativum ( bread wheat).

spelt-flour

The first time I tried to make a SPELT pancake though, I failed. 😃😃 I did not like the texture. It felt gooey and just not my cup of tea, even though my friends and family still ate it and said it was good ( either it was good, or they just love me and don’t want to hurt my feelings haha!)

my-spelt-flour-pancakes

This is a picture of my first try at using SPELT. The chocolate sauce saved the whole dish, I think! 😃😃

 So I decided to read up on it and finally found what my recipe lacked of! BAKING POWDER. Okay.
Problem solved. Sometimes it’s just the simple things that one should look into, wouldn’t you agree?
Okay, I will shush now and just give you the recipe. It’s so simple, YOU. MUST. TRY.
SPELT WAFFLES
Ingredients:
1/2 cup spelt flour
1/2 cup sorghum flour
2 tsp baking powder
1 scoop of vegan vanilla protein powder( optional)
Pinch of sea salt
1/2 ripe banana
1 cup non dairy milk ( I used almond)
1 tsp lemon juice of apple cider vinegar
1 teaspoon coconut nectar ( your choice of sweetener)
1/4 cup water ( no need, if you omit protein powder)
Method:
1. Put ingredients 1-5 in a mixing bowl, set aside
2. Put ingredients 6-9 in a blender and blend until smooth. Or you can also do manually by mashing the banana with a fork( this will take a little longer and consistency will not be as smooth)
3. Pour the mixture in no.2 to the mixing bowl of dry ingredients (which is no.1) and fold in until you get a thick but still watery pancake consistency.
4. Add in the 1/4 cup water a little bit at a time, ONLY when needed. You will need this if you use the protein powder, but if not, I find that I didn’t need to add any.
5. Heat your pancake pan, or in my case a waffle pan, brush lightly with coconut oil, then cook waffles for about 3-4 minutes. The centre will start to bubble, FLIP and cook for another 1 minute, and you’re done!!
Note: you may put 1 cup spelt for this recipe, it works too!
I just did my own thing by doing 1/2 spelt and 1/2 sorghum.
A little word of advice though: THESE WAFFLES DISAPPEAR REALLY FAST! 😃😃 your family will love them!
ENJOY with your favorite fruit or jam or chocolate sauce.
my-spelt-waffles
my-spelt-waffles-final
Please make sure you tag me on instagram at @sophienavita if you make these. I would love to know your thoughts on SPELT. I really am NEW to spelt. 😃😃
Wishing you lots of love today. Remember, you are enough.
LOVE. LOVE. LOVE!
s3

Spicy Cheese Sauce

By | Recipes | No Comments

Hey, everybody. I have just landed in Melbourne, Australia for some work. I don’t know if you know this or not, but Melbourne is also home to me. I just love this city— four seasons in a day and all.

s1

Yes, this is me at 8 am Melbourne time, meaning 5 am Jakarta time, in my sleepy face but morning lipstick haha!

Okay enough narcissism, on to recipe.
I am not a big cheese lover, but ever since I discovered vegan cheese a few years ago and how you can make them easily at home, I was hooked.Especially since they are much more nutrtious and I know what I put in it.

But then, I got tired of them, because they consisted of nuts, nuts, nuts. Then I found a eureka moment. I made my vegan cheese from seeds. Sunflower + Pine Nut Cheese and that worked for a while. But still, it can get quite heavy —then again, I was probably eating too much of it. Ha.. Ha !

Then one day, another Eureka moment came. I was cleaning out my refrigerator and had 1 almost over ripe avocado which I had to use.I didn’t want to make smashed avocado on toast, so I tried to be creative and came up with this magical mix! YOU. WILL. GET. HOOKED. TOO!!
The secret lies within the SWEET CORN, ladies and gentlemen! (imagine my smug face right now)

Okay so here it is:

unnamed

SPICY CHEESE SAUCE

1 cup sweet corn, shaved (raw or cooked, i prefer steamed a bit)
1 avocado
1/2 red bell pepper, chopped
1 teaspoon SOPHIE POWDER FIX
pinch of salt
1 teaspoon sundried tomato powder (optional but recommended)
2 Tablespoons Nutritional Yeast
2 Tablespoons Lemon Juice

Directions:

1.Put everything in a food processor and process until well incorporated.

2. Pour over favorite pasta. I mixed raw and cooked which was 1 spiralized zucchini and 1 /2 cup of cooked glutenfree pasta. Add chilli flakes or a dash of sriracha if you need more spice :)

Please try and tag me on my Instagram @sophienavita when you do!

The only downside to this non nut version is, you have to finish it all in one day. It will probably last only 3-4 hours in the refrigerator because of the avocado :)

sp

MATCHA: Not your everyday green tea.

By | Blog | No Comments

MATCHA.

Not just your ordinary green tea. I take the time to write this, as I sip my warm Matcha Almond Milk with some strawberries. Bliss ❀❀

When it comes to buying matcha, it’s worth learning the real differences between a quality matcha and one that is just so-so.
We simply think that looking for matcha described as “Ceremonial Grade,” versus “Food Grade” or “Ingredient Grade,” ensures we are buying good matcha, right? Wrong. Here are my tips:

1. The more vibrant the green, the better the quality. This is because Matcha is grown in the shade, so the tea leaves are forced to OVERPRODUCE chlorophyll, hence the color. Lower quality matcha, tends to be made up of leaves that have not been properly shaded, or that may be older . More Chlorophyll, means nutrient dense to me:))

2. Higher quality grades deliver a smoother taste, a better mouth feel, and are generally less bitter. Why? Because high grade matcha contains L-Theanine. L- Theanine is an amino acid that gives matcha it’s nice clean taste and sweet smell. Low quality Matcha will have a bitter taste because it lacks the L- Theanine

3. Anything less than $30 per small tin is usually NOT high quality. I remember I got mine for $70 in a small but pretty tea store when I was visiting Canada, where the owner knew each and every tea she served from around the world, like a mother would know her child. Pricey! But worth every dollar. My matcha tastes SOOOOOO GOOD!

4. High quality grade Matcha powder is very fine and silky, imagine eye shadow! A lower-quality grade has a bigger particle size, which results in a coarser feel.

5. KNOW where your Matcha comes from. Yes JAPAN! China and Taiwan, also produce matcha, but believe me, not worth it. Also, in Japan itself, these two regions, Nishio city in Aishi and Uji City Kyoto, produce the best ones!

So I hope now you know, that going into your regular coffee shop to get a matcha tea or matcha latte, usually means you are getting a low grade one. This is because it wouldn’t make sense for your regular neighborhood coffee shop to sell high grade Matchas, then sell them for cheap.

My Matcha knowledge is purely through my observation, high intensity of travel, articles I’ve read and stories from sophisticated tea store owners who sell Matcha.

Last but not least, Make Your Matcha Right!
Add hot water to the powder and then whisk with a bamboo implement called a chasen. Proper whisking adds to the smoothness of the beverage. There should be no lumps on the side of the bowl.

I do not own a Chasen yet. I whisk mine with a battery operated frother. Hmm.. Probably high time I visited Japan just to buy a Chasen? 😁

I’ll end this blog with an invitation to purchase my newest ebook. i wrote one entitled: KEEPING IT REAL ,a 21 DAY BREAKFAST PLAN.
It’s a super SIMPLE book for first timers who want to change what they eat for breakfast, to have more energy and feel light and clean!
I have included shopping lists and a task list. I really guide your hand through this, there is NO way you can get it wrong!
Click here NOW: http://bit.ly/1hBaoeX

You get 21 days worth of SUPER SIMPLE smoothie recipes for a healthy breakfast PLUS an extra set of recipes for those days when you want to eat healthy, but want something else plantbased! Imagine granola, coconut yoghurt, etc!
No dogmas, No stress, No judgements!

So grab your copy now!! http://bit.ly/1hBaoeX

You will be so happy!

CHILLI

SRIRACHA Made Easy and Healthy

By | Recipes | No Comments

Hey, there lovelies! I know, I know, it’s been a long time since I wrote another recipe or even a blogpost.
I have been very busy lately with LOADS of things. My school work has kept me busy ( I went back to school to take Holistic Nutrition) plus I have been writing my next book and then my kids of course, always come first in priority. But, that’s all sorted out now, and I have started posting again. Yayyerrss.

At first I thought, what should I start with? You know that state of being in anxiety and forever overwhelmed? Haha, you get it, right? So let’s start with a simple recipe where it will be hard to get it wrong! Besides, the Asian side in me, has been screaming for some hot and spicy sauces lately, and so I present to you, the famous SRIRACHA!! *confetti* *fireworks*

SRIRACHA comes from Thailand. Although lately, it has begun to get more and more famous worldwide, resulting in more and more companies producing bottled SRIRACHA in supermarkets.

Some people know SRIRACHA as the rooster sauce. Basically, it’s just a simple chilli sauce that you can make a HEALTHIER VERSION of at home! Ready? Here watch this little video I made with my good friends who are good eaters too, like moi! Ha ha!

Did you like that video? Did it make you want to know more?
Okay, I’ll stop my chatterbox chit chat and give you the recipe now. 😀 😀

SRIRACHA MADE EASY AND HEALTHY

Ingredients:

500gr red chilli (actually jalapeños work the best, I think) or 1 pound chilli, stems off
8 garlic cloves, peeled
6 Tablespoons coconut sugar
1/2 Tablespoon seasalt
3 Tablespoons Rice Vinegar (or White Vinegar)
1/2 teaspoon Xanthan Gum (optional)

Directions:

1. Put chilli, garlic and sugar in a Food Processor (FP) and process until you get an almost smooth texture.

2. next add in the salt, process, and then pour into a clean jar, cover (not too tight, just enough) and let sit in a dry space, avoid direct light.

3. Each day check your jar for any activities of fermentation, so open the jar once a day and stir with a spoon, cover jar again (not too tight) and put back in the same dry space, avoiding direct light

4.On day 3, usually you will see some bubbles forming, this is a sign that fermentation has started to occur. GOOD SIGN :)) Keep stirring gently ONCE A DAY.

5. On day 5, usually I stop fermentation. If you live in a colder climate, it may take a little longer, maybe up to 8 days, so check frequently. Pour contents of jar into a blender with vinegar and blend until smooth. Test taste and adjust salt accordingly, if needed only.
**Here is where you can use a little bit of xanthan gum should you choose to. For me, it’s usually enough without the xantham gum, but I find that people who want a thicker consistency like it with a little bit of Xanthan gum.

6. Usually, the SRIRACHA is ready to be enjoyed as is. Transfer into a clean jar and refrigerate. It can keep for 3-4 months.

VARIATON:

After step #5 , take 2 cloves of garlic, wrap in aluminium foil and roast in oven for 20-25 minutes on 170 celcius or around 300 Farenheit,. Once garlic is done, pop into blender with SRIRACHA and blend till smooth. Pour the blended SRIRACHA into a pot (pan), keep pushing through so you get a smoother consistency, start heating the pot of Sriracha. keep stirring, until consistency thickens, turn off heat.
Let SRIRACHA cool, then transfer into clean jar, keep in refrigerator. It can keep up to 3-4 months.

I really hope you try this and see how you like it. Use your sense of smell and be sensitive when it comes to food making. Sniff and smell to see if your SRIRACHA ferments or goes bad. You do not want it to go bad.
I trust you.You will not let it go bad.
What I like to do when making food is, making a connection to the food I make. Putting in good intentions. I like to talk to my food while preparing them. I usually say things like; “ Hey, hi there, thanks for coming all the way from the farm to my place. I’m going to make you taste delicious and stay nutritious for my family and friends and me”

Here’s a longer version of the video on my YOUTUBE channel

Alright, people
. START YOUR SRIRACHA today!

P.S one more thing, I recently made a 21 DAY KEEPING IT REAL BREAKFAST PLAN. It’s for YOU if you really want to try to change the way you eat at the start of everyday! You can grab your copy here

SpicyTom-NEW

Spicy Tom

By | Recipes | No Comments

So, today is SOUP DAY at our house. I always try to find ways to make my family eat more plantbased foods, especially veggies. Although, I can safely say that my kids are very good in eating veggies ( phew…it’s hard work, i tell you, but you gotta start them young, right?) , I must admit, that always having a daily dose of salad or quick sautĂ© vegetable on the table, can be quite boring 😀 😀

This soup is the perfect dish to make your family eat more veggies without them knowing it!! Why? BECAUSE this soup is made from Veggie Stock.  Yes, VEGGIE STOCK is made from Vegetables. All nutrients in the liquid, WITHOUT them knowing anything! SSSssshhhhh….. THIS. IS . SO. GOOD!!  Here is how to make VEGGIE STOCK, in my last blogpost!   https://sophienavita.squarespace.com/config#/pages/54e4e108e4b0b40cb7632c12|/blog/2015/4/13/veggie-stock

My version is an OIL FREE version, however if you want to sautĂ© the aromatics (ginger, garlic, galangal etc you will see in recipe) with oil , I suggest COCONUT OIL. This all star oil ( to me, at least)  can withstand high heat, making it suitable for frying food ( although I do not suggest frying ). COCONUT OIL is also considered a superfood, due to it’s antimicrobial properties, also high in antioxidants, also because it is a medium chained fatty acid, means, the way it enters our blood system is different from how meat enters our system ( animal protein can clog up your system, if you’re not careful) . I always say coconut oil, is the GOOD FAT that can actually help you lose weight! it keeps you full for longer periods. Plus, by using coconut oil, you will be helping orangutans live longer. In Indonesia, we have been using to much palm oil (other alias: vegetable oil. indonesian: minyak sawit) . The more we support these oils, the more demand there will be and more palm plantations will be opened, meaning more burning of forests, cutting down trees etc to actually make a plain for the plantation, creating havoc. AIr pollution, danger of floods,  and more and more animals will be forced out of their natural habitat (especially orang utans) and slowly die :(  I am not trying to make anyone uneasy by bringing up all these facts, I am just trying to live more harmoniously with nature. Sustainable eating. Responsible living. After all, we do not own this planet, we are borrowing it from our children. Right? :)) Okay now on to the recipe!

For soup:

2   T chopped garlic

1   T chopped ginger

1/2T chopped galangal

1 red bell pepper chopped roughly

2 stalks lemon grass, bruised

1    T paprika powder

1    T coconut butter ( divide into half portions)

1 bunch cilantro

1 handul basil or thai basil for garnish

5 sage leaves

4 cups veggie stock

1 t seasalt

1/2 T maple syrup ( or 1,5 t coconut sugar. Use stevia powder if you have blood sugar issues)

1/2 T fresh lime juice

1 t homemade chilli sauce (sriracha) or chopped chilli (or sambal oelek in a jar. bisa juga buat sambal sendiri ya)

Accompaniments:

*Baked oyster mushrooms

*Steamed bokchoy, steamed beansprouts

Baked mushrooms:

2 cups oyster mushrooms (jamur tiram), marinade for 10 minutes in 1 T lemon juice, pinch of salt, 1/2 tsp tamari and cracked black pepper. Bake until outsides become brown. Not too dry though. around 10 -15 minutes in 200celcius, each oven may vary, so to be safe, put a timer on and hire somebody to watch the shrooms ( hahaha
)

METHOD:

Heat a pot, while waiting, put the chopped red bell pepper + 1/2 T coconut butter  in a blender with a cup of veggie stock , blend and set aside.

When the pot is hot, put in chopped garlic and stir it around, making sure it does not burn. When the ginger releases it’s  fragrance, put in the other 1/2 T of coconut butter and stir it around. The goal is to get the coconut butter to brown just a bit and mix it with the ginger. Watch closely, do not burn the coconut butter. Turn down the heat if you must.  ( Coconut butter is a spread made from the meat of the coconut much in the same way peanuts are used to make peanut butter. Or Almond Butter. It can be enjoyed with your favorite fruit, combined into smoothies, blended into coffee, if you are a coffee drinker etc. You can make your own coconut butter by blending dehydrated coconut meat into a Vitamix or high powered blender, or if you do not have time, you can always buy them. My favorite brand that I can get here in Indonesia would be Artisana. I usually get them from www.thehonestgrocer.com . If you do not have coconut butter, you can always blend 1/2 cup coconut meat with 1 cup water and strain, or use canned coconut milk, then add it in the soup when you have turned off the heat. ( kalau tidak ada coconut butter, pakai santan biasa saja 1/2 cup dan dimasukkan pada saat masakan sudah jadi, saat api sudah dimatikan)


After the ginger and coconut butter have incorporated into one, put in the chopped garlic,  and tear the sage leaves and put in too. Stir for a bit, to let garlic release fragrance, then pour in a bit( around 3T) of the BLENDED BROTH, let this mixture sweat a bit, keep stirring. The goal is to build all these flavor from scratch, so be patient:) Yes, your heat is still on medium low.

After the liquid has reduced, now put in the bruised lemongrass stalks ( sereh yang digeprek), galangal, onion powder, paprika powder, pretty much everything else on the list  (except sweetener)and stir, let it release fragrance, while adding the BLENDED BROTH bit by bit until finished, while adding in your choice of sweetener.

Now, spoon the soup into bowls, and add the accompaniments. You can always add Vermicelli / Rice Noodles ( bihun), or even Shirataki. This should serve 4-5 soup bowls, or 3 very big soup bowls.

Voila…. enjoy this hot!

Please tag me on my instagram if you make this! It’s really good on a rainy day. I am at @sophienavita

Any comments or suggestions, please feel free to write below:))

Catatan: T (huruf besar adalah Tablespoon), t (huruf kecil) adalah teaspoon. Bukan sendok biasa ya, jadi belilah sendok takar di toko-toko alat memasak. Selamat Mencoba!

static1.squarespace.com_

Banana Bread

By | Recipes | No Comments

Hey there. I know, I know, it’s been so loooooooooooong since I last posted a blogpost. The reason is, I have been so busy lately, developing recipes for my NEW book. Yaayy! I am finally going to get it done! (insert audience going “awwwww” NOW! Hahaha)

Also, I have been taking time to slow down  bit. I felt that I really needed to get to know myself more and what I want in life, and the answer is: really making my website and blog work to be able to express myself, and to really be disciplined about my latest project #LOVELETTERSFROMSOPHIE which you can get, if you subscribe to my love letters bu clicking subscribe in the box to your right!.

So what have you been doing lately? I hope you are happy and healthy and well balanced. I really do. Even if you’re not in your best shape right now, I wish that things will clear up for you, and that you have the patience to go through the process.

For now, all I can do is……. GIVE YOU ANOTHER AMAZING RECIPE TO TRY, BECAUSE YOU ARE AMAZING!!

So, if you are ready, here’s the recipe:

DRY

1/4 cup banana flour
1/4 cup millet flour (or sorgum, but I prefer millet for this one)
1 cup buckwheat flour
1/2 cup chestnut flour or chestnut meal (you can use almond flour too)
1 Tbsp carob powder (you can use cacao if you want)
3 Tbsp flax meal
1 tsp baking soda
1 tsp cinnamon powder
1/2 tsp cardamom powder
pinch of sea salt

WET

1 cup buttermilk by combining: 2 Tbsp lemon juice, 3 Tbsp xylitol (or coconut sugar), 1 cup almond milk
1 cup water (or LESS if you are using nut MEAL instead of flour)
1/4 cup vegan chocolate chips
1 Tbsp extra virgin coconut oil


Method:

  1. Combine all DRY ingredients in a mixing bowl and mix well with a spatula.
  2. Preheat oven to 190 celcius.
  3. Add in the wet ingredients slowly to achieve a wet but thick consistency. It should not be watery thin at all.
  4. Fold in Vegan Chocolate chips and add in oil, mix well.
  5. Pour into bread tin and bake for 25-30 minutes. (each oven is different, so you might want to peek from the outside to check)

Note; I used banana flour, so that I need not use an actual banana in the batter anymore. This is because I have some sort of a fruit malabsorption. I was also using Chestnut flour, because I was trying a low histamine flour.

You can always substitute the Banana flour with chickpea flour, but also add in 1 average size banana in your butter milk blend, and adjust the water.  REMEMBER: thick batter. NOT watery thin:))

I do hope you make this. Please tag me on my instagra, at @sophienavita if you do.

Love you!! see you soonest!

v1

Raw Brownies

By | Recipes | No Comments

The classic recipe for RAW BROWNIES. It’s still a load of nuts though, so EAT SPARINGLY.

INGREDIENTS:

2 cups raw walnuts, washed, soaked 4-6 hours, then rinsed and drain
1/4 cups reserve walnuts (for topping) exactly, washed, rinsed, drained like the above
6 Tablespoons chopped medjool dates
2 Tablespoons raisins
3 Tablespoons Raw Cacao
3 Tablespoons Carob
1/4 cup water just in case
pinch of salt
1/2 drop of Young Living Peppermint Oils (GRAS, foodgrade— or any peppermint extract you have)

DIRECTIONS:

1. First put in 1/4 cup reserve walnuts in a FOOD PROCESSOR and pulse until you get a gritty texture for the topping. Set aside
2. Next put in 2 cups walnut, dates and raisins, pulse until you get a finer texture, but not too fine yet
3. Add in Raw cacao, Carob, pinch of salt and process until sticky. If your dough is to dry, add water as needed only. You might not even have to add water, depending on the dryness or wetness of your walnuts. Add peppermint oil last, and immediatley stop processing
4. Take out of Food Processor and knead a bit, then shape into moulds or pans
5. Chill in the refrigerator for an hour and serve cold

meegoreng

Mee Goreng

By | Recipes | No Comments

MEE GORENG… so asian, without the overuse of oils and msg!


Hi there…

Have you missed me? Ha:) Just dropping by today to tell you how much I miss my Asian delicacies!

If you were ever brought up in Asia, you must know by now, that street food vendors are everywhere to be found! In Indonesia, they even walk up your alley!

The first time I was loved back to Indonesia by my parents, in 1989, I was shocked! We used to live in SIngapore, where everything was clean and in order. You can’t just find food vendors any old how. You would have to go to an area where they actually have government permit to sell street food in Singapore. Whereas, in Jakarta, Indonesia, where we were moved to at that time, the food vendors literally were scattered everywhere. From walking up to your road, to small alleys, to just stationing by under the trees. I must say, the food they serve are downright delicious. But if you are not used to eating like this, you might want to carry activated charcoal tablets with you. Really, these delicious foods, when you’re not accustomed to them, can give your tummy the shock of it’s life! 😀 😀

I grew up, trying to blend in with my surroundings, having occasional tummy problems on and off when I ate these foods. In Indonesia, this culture of buying foods from vendors is called “jajan” (juh-jun). It has become a favorite family past time for any Indonesian. Ask any Indonesian, and they will verify this!

As fun as it may sound, I am actually worried by this culture. More and more people have become lazy at  home cooking, and now just want to “jajan” from the food vendors that are so easy to find. These are delicious Indonesian food dishes, that are no more cooked with love, but just cooked out of routine from a vendor who is usually frustrated by his own economic and social status in the country, due to the suffocation and congestion from our population explosion. To make it even worse, these vendors use palm oil which is used over and over again to reduce production cost, but as we all know, this is far from healthy, all these oils clogging up your arteries! Then they also go crazy on MSG (monosodium glutamate) powders, because, hey.. who has the time and patience to make up a natural stock from natural ingredients, these days, right?

All this has added to my frustration, that all these delicious Indonesian food is being downgraded to it’s lowest and stripped off from any hope of nutrients you wish to obtain from them. Food should be fuel, right? Not weighing us down :( And in the previous years, this problem has gotten bigger and bigger. More and more Indonesians are suffering from diabetes, heart failure and cancer related health issues, just from enjoying the Indonesian culture of “jajan” . How sad is this? :(

The only way I can think of, to give back to my fellow countrymen is by initiating a movement called INDONESIA MAKAN SAYUR. It actually translates to Indonesia eats vegetables. What I really mean by it, is Indonesia eats (more ) PLANTBASED foods. But since we do not have a word to describe plantbased, I had to use the term sayur.

You can find us on facebook or on instagram.  We encourage people to eat more plantbased local foods. No, we’re not about turning people into vegans or vegetarians, don’t worry haha..I I am a firm believer of the term “ to each their own”I

If you’re an Indonesian looking for support from the same kind of people trying to eat and live better, then this is the account to follow. If you’re an expat living in Indonesia, looking for healthier plantbased options to eat here, then DEFINITELY, we are the account to follow. We have so many tips and information on where to find what. You can even drop us a comment on insta and our admin will help you. Yes, you can do it in English or Indonesian. If you haven’t already, please follow us on instagram @indonesia_makansayur .

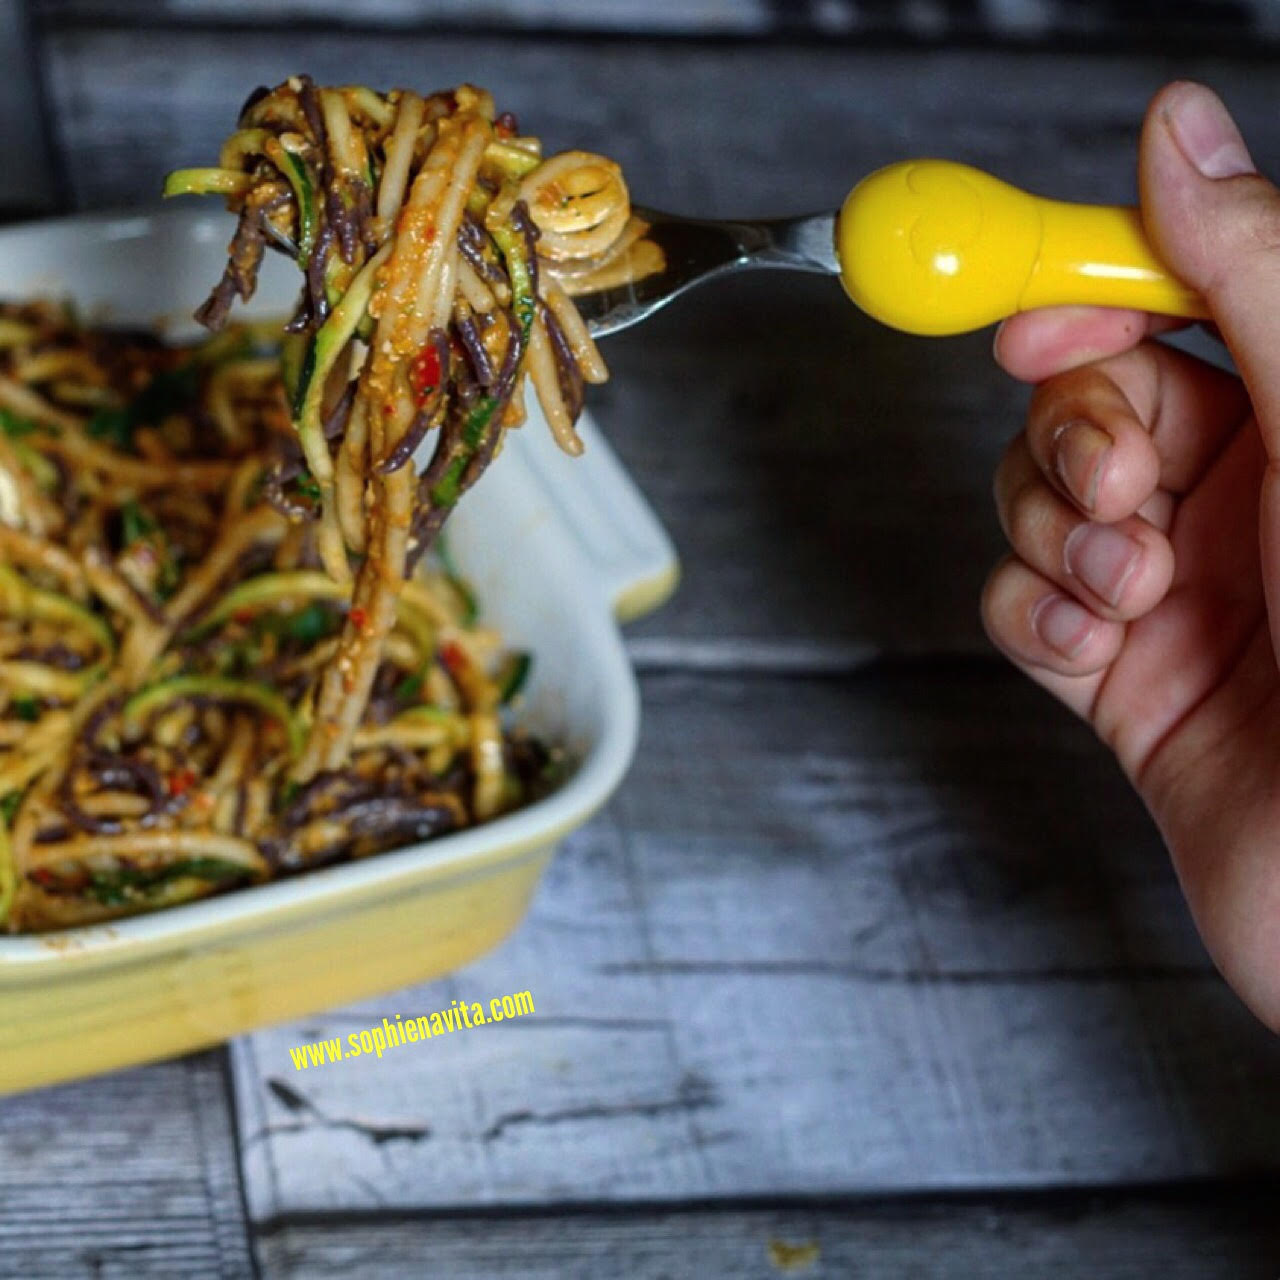
So, last night I had a craving of street food, Indonesian style. The classic mie goreng you find on the streets, cooked in oil laden woks mixed harmouniously with debri from the roadside and occasional fly visits, haha. Here’s my rendition. A healthier option. Cooked in  Cold Pressed Virgin Coconut oil. Enjoy!

INGREDIENTS

2 cups of healthy option noodles, cooked according to instructions then strained.( i used the tomato noodles by HEALTHY CHOICE)

1 Tbsp of minced garlic

1 Tbsp virgin coconut oil

1/4 cup chopped leek or you can also use spring onions

1 cup carrots, cut into matchsticks

1,5 cup of torn greenleaves ( i used kale. you can use bokchoy, or kailan, or horenso spinach, or baby spinach even)

1/4 cup chopped cilantro

2 tsp SOPHIE POWDER FIX (please see recipe in my previous post, if you don’t have access to it, then just mix up 1/4 tsp coriander powder, 1/4 tsp cumin powder, 1/4 tsp paprika powder)

2 Tbsp of tamari or Braggs Amino Acid ( a healthier lower sodium option for salty sauce)

ground pepper to your liking

1/2 tsp of toasted sesame oil ( i used truffle infused extra virgin olive oil for mine)

1 tsp of SriRacha or your fav chilli relish (sambal) — i used my homemade Sriracha, will share the recipe one day, promise:)

————————————————————————————————————————–

1. First heat your pan or wok. add in the coconut oil and sautĂ© the leek, followed by carrots.Once leek has begun to release fragrance, add in the garlic, stir around, BE CAREFUL not to burn the garlic. Then add in SOPHIE’s POWDER FIX and keep stirring around, lower heat a bit if you must.

2. Add in the cooked noodles, tamari, sriracha and stir around some more. Then once they are evened out, add in the torn greens, mix it up a bit, but not until greens become mushy. Then add in chopped cilantro and straight away turn off heat.

3. Transfer to a serving bowl, add in the toasted sesame oil, mix and serve straight away.

I had baked tempeh with on hand, so i served it with some of that. Sprinkled it with blackpepper and some organic Purple Radish Sprouts. Oh.. so ..pretty!!

Try to make your own variatons! You can even add tofu or mushrooms! Just promise me you will use cold press virgin coconut oil to cook them.  It’s so much more healthier, as coconut is a good fat, and it saves the environment too! Palm oil takes away the homes of Orangutans and causes more floods to happen in this country, plus it clogs up your arteries.

Let’s be mindful of what we put into our mouths to nourish our bodies, and make this planet a better place too!

Hope you try it. Please tag me if you do on instagram, @sophienavita

Before I leave you with the rest of your day, I would like to invite you to get more connected with me. I will send you a monthly newsletter on my favorite recipe, or natural beauty tips or motherhood stories, or even my thoughts on nutrition for the family. Would you like to be connected with me? please go to http://www.sophienavita.com and CLICK on that red button to submit your email address to my mailing list. I promise, no spamming and LOADS of fun!!


Yours in health and joy,

Sophie Navita, xoxo

quinoa

Quinoa Mint Salad

By | Recipes | No Comments

I had just come back from a business trip from Bali, and was feeling tired and the MGS coming on to me,

MGS? Yes, I made that abbreviation up. It stands for Mommy Guilt Syndrome.

Oh, we’ve all been through it. You know, that feeling of guilt because you had to go away and do some things and leave your kids for some time ? Yeah, that one. If anything, it actually makes you feel more tired.

So, I do what I always do when I am in this mode. I chant my Ho’oponopono mantra. Whattt?? Say that word again.

Hoʻoponopono (ho-o-pono-pono) is an ancient Hawaiian practice of reconciliation and forgiveness. You can read more about it when you google, later, okay?

Basically, it’s a self healing method I like to do, that’s easy and relieving. So what I did was:

1. Sit and be quiet and breathe conciously, then said to myself: For all the guilt that is building up now, causing me to feel even more exhausted and frustrated for nothing:

I’M SORRY. I FORGIVE YOU. I LOVE ME. THANK YOU

2. Then I breathe in deeply. If it still feels heavy, I repeat it again.

3. After this, I usually feel light and clear. I drink water, and head straight to the kitchen to make a rockin delicious healthy meal for my family.

Sounds simple, eh? But it works. This method is just one of my many collections of self healing methods I choose from my “tool box” 😀

We, especially us, women in this case, tend to mother everyone and everythig else, except ourselves. Sound familiar? Haha, thought so :)

Okay, so here’s the recipe:

QUINOA

1.5 cups quinoa
2-3 cups water or VEGGIE STOCK to make it tastier. I posted about VEGGIE STOCK before here.
1 t cinnamon powder or 1 cinnamon stick
1 lemongrass stalk bruised
1/2 fennel bulb(optional,but makes the difference. You can opt for 1/2 t ground fennel powder too if you want)
1/4 cup cilantro, chopped
1/4 cup mint, chopped
1/4 cup spring onions, chopped
1/4 cup chopped almonds.

ROASTED ZUCCHINI

1 medium zucchini. cut into halved rounds
1 T tamari or Bragg’s Liquid Aminos
1 t coconut nectar
1/2 T extra virgin olive oil (EVOO)
Ground blackpepper + seasalt (pinch)

SAUTÉED MUSHROOM VEGGO

1/2 cup brown onions (minced)
1/2 cup halved mushrooms
1/2 cup baby corn, halved lengthwise
1/2 cup broccoli florets
1 medium sized red bell pepper, cored, then sliced lengthwise
1 tsp SOPHIE’S  POWDER FIX ( see in my other post)

Ground black pepper + sea salt

1 T coconut oil

Here’s how I did it:

  • Cook the quinoa according to instructions on package, except this time, you use VEGGIE STOCK, if using. Or just plain water. But throw in the cinnamon, cardamom, lemongrass and fennel in the water too. Let it cook. Once cooked, discard lemongrass, cinnamon stick and fennel bulb, strain, and let quinoa cool in a bowl. Add the chopped cilantro, mint, spring onions and mix throughly, slowly. Set aside
  • While the quinoa is cooking, you can roaste the zucchini. In a bowl, place the half rounds of Zukes and add ij the tamari and coconut nectar. coat them evenly, then place on a baking tray lined with baking paper, and oven roast in 150 celcius for about 15 – 20 minutes. Watch them though. Don’t burn them. We just want them to dry a bit.Once done, put in a bowl and drizzle over EVOO, seasalt + blackpepper. Set aside.
  • Heat pan and pour in coconut oil, once heated, sautĂ©e the brown onions and stir around until they have softened and released fragrance. Then put in the mushrooms, stir around, add in babycorn, keep stirring around, so the cook evenly. After a while add in the broccoli florets ( I added a bit of my torn kale leaves, just to clean up the fridge), stir around, add seasalt, blackpepper , and SOPHIE’S  POWDER FIX, at the end, throw in the sliced red bell peppers and turn of heat. Set aside.
  • Now take a bowl and assemble. Put a bit of the quinoa, the sautĂ©ed mushroom veggo, then assemble the Zucchini, add in your choice of greens (I used romaine hearts, you can use whatever greens you like), sprinkle some almonds, and add slices of avocado. I also added some sourdough  smothered with my almond cashew cheese ( I bought from this super cool artisanal breadshop in Jogjakarta, Indonesia, look them up if you live in Indonesia, they do delivery it’s called KEBUN ROTI , they are also on instagram @kebunroti) 

The bread was just my last minute idea, since I was sooo hungry. I aslo added some bake tofu leftovers (you can bake tofu exactly how you did with Zucchini)

This salad already tastes so good anyway. The key is in the fresh minty lemony quinoa. You can always dress your choice of greens in balsamic vinegar if you want, or just plain EVOO+black pepper. Totally your choice what you do with it:)

PLEASE tag me if you try this Quinoa recipe. Comment here, or tag me on instagram @sophienavita!

PLEASE take the time to click into my newest YOUTUBE video about Guacamole .. it’s here https://www.youtube.com/watch?v=06S1TtU6WaU

PLEASE feel free to comment here, if you want to connect with me. Or leave an email !

Okay, I gotta go wash the dishes now. Remember, YOU ARE ENOUGH. 

I’M SORRY.

I FORGIVE YOU.

I LOVE ME.

I LOVE YOU.

THANK YOU.

Love, with broccoli in my hair…..

Soph!

poedermix

Sophie’s Powder Fix

By | Recipes | No Comments

Okay, this post has nothing to do with make up powder 😀

After learning to cook plantbased for quite some time, one thing I have learnt is, that time management is key. Also herbs and spice mixing. This powder mix was inspired by my plantbased guru chef Chad Sarno. If you haven’t heard of him, you’re missing out BIG TIME !! This guy’s amazing!

So, yeah, similar to Chad’s version, I tweaked it here and there to my own palette. See if it works for you, or who knows, you might come up with your own version !

  • 3 tbsp paprika powder
  • 2 tsp oregano
  • 1 tsp cinnamon powder
  • 1/2 tsp tumeric powder
  • 1/2 tsp white pepper
  • 1 1/2 tsp cumin
  • 2 tsp garlic powder
  • 1 tsp onion powder
  • 1 1/4 tsp cayenne pepper
  • 1/2 tsp chipotle powder

mix it in a bowl, then transfer to a small airtight jar. Now, you are ready to make beautiful herb and spice rich dishes, whenever you want to:)